Developing Microservices by using Lumen & RabbitMQ — Part 3
In the previous articles, we have covered the basics and also the fanout exchange, in this article we are going to explore the direct exchange and also develop two services that use this exchange. As it was explained in the first part of the series, A direct exchange delivers messages to queues based on a message routing key and the message goes to the queues whose binding key exactly matches the routing key of the message.
What we are up to in this article?
Now we are going to create two email services in which each one might have a different functionality or the same (it’s not our main focus to discuss it). Consider the situation that we need to email the order information to two different mail service, we are only going to focus on our direct exchange capabilities.
One of our main purpose of providing this series was how to interact with RabbitMQ in Lumen or Laravel project or how to use RabbitMQ to send messages to other applications in the SOA or Microservice architecture.
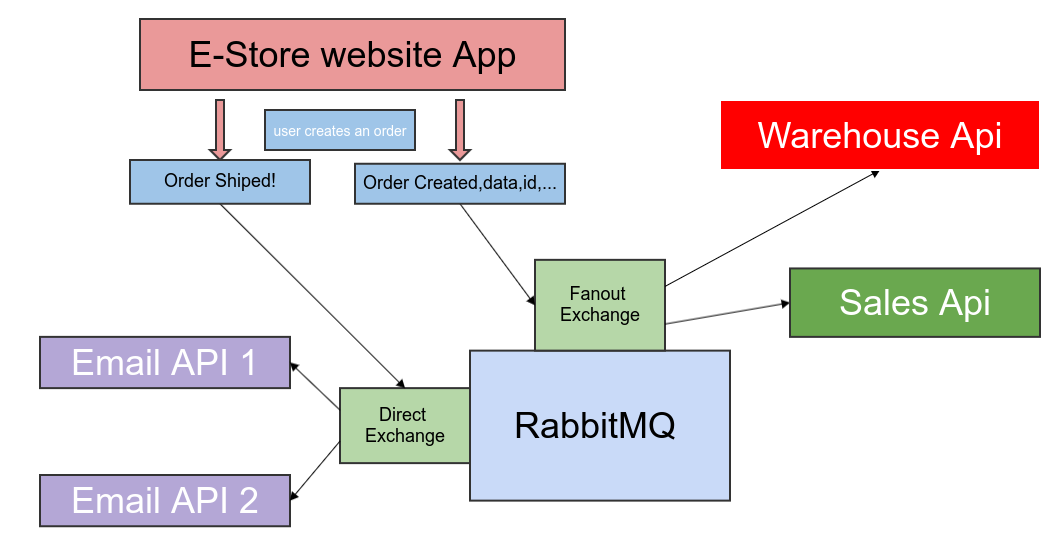
Just to make sure that we are on the same page, I need to go over the workflow once again. In the previous articles, our workflow was like this, when one order is created we simply sent the order information to the warehouse and sale service by using a fanout exchange, and now when the order is shipped we want to notify the user by sending him/her an email by using one of our email services, we are accomplishing this task by using a DIRECT Exchange.
I have added the repository links for references.
Email-service1 repository:
https://github.com/behzadbabaei/lumen-microservice-email1.git
Email-service2 repository:
https://github.com/behzadbabaei/lumen-microservice-email2.git
So first of all we need to configure the RabbitMQ, go to your RabbitMQ dashboard, create a direct exchange, name it “email.direct”, then create two queues named “email.service1” and ”email.service2”, then bind the queue “email.service1” with routing keys of “email1” to “email.direct” exchange, and finally, bind the queue “email.service2” with routing keys of “email2” to “email.direct” exchange too. we are done with configuring the RabbitMQ for now.
First of all, we need to configure our E-Store project. We are going throughout the process step by step.
First configuring the RabbitMq for direct exchange. In the config/queue.php file in the ‘connections’ array add the code below:
'rabbitmq_direct' => [
    'driver' => 'rabbitmq',
    'queue' => 'email.service1',
    'connection' => PhpAmqpLib\Connection\AMQPLazyConnection::class,
    'hosts' => [
        [
            'host' => env('RABBITMQ_HOST', '127.0.0.1'),
            'port' => env('RABBITMQ_PORT', 15672),
            'user' => env('RABBITMQ_USER', 'guest'),
            'password' => env('RABBITMQ_PASSWORD', 'guest'),
            'vhost' => env('RABBITMQ_VHOST', '/'),
        ],
    ],
    'options' => [
        'queue' => [
            'exchange' => 'email.direct',
            'exchange_type' => 'direct',
            'exchange_routing_key' => "email1",
            'prioritize_delayed_messages' =>  false,
            'queue_max_priority' => 10,
        ],
        'exchange' => [
            'name' => 'email.service',
            'declare' => env('RABBITMQ_EXCHANGE_DECLARE', true),
            'type' => 'direct',
            'passive' => env('RABBITMQ_EXCHANGE_PASSIVE', false),
            'durable' => env('RABBITMQ_EXCHANGE_DURABLE', true),
            'auto_delete' => env('RABBITMQ_EXCHANGE_AUTODELETE', false),
            'arguments' => env('RABBITMQ_EXCHANGE_ARGUMENTS'),
        ],
        'ssl_options' => [
            'cafile' => env('RABBITMQ_SSL_CAFILE', null),
            'local_cert' => env('RABBITMQ_SSL_LOCALCERT', null),
            'local_key' => env('RABBITMQ_SSL_LOCALKEY', null),
            'verify_peer' => env('RABBITMQ_SSL_VERIFY_PEER', true),
            'passphrase' => env('RABBITMQ_SSL_PASSPHRASE', null),
        ],
    ],
    'worker' => env('RABBITMQ_WORKER', 'default'),
],
In the config above we just created a new connection that uses the direct exchange, we also have set the default queue with routing key which is “email.service1” with the routing key of “email1”.
Now it is time to create the required events and handler. Create an event and name it OrderShipped in the app/Events folder and put the code below in this class:
namespace App\Events;
use App\Order;
class OrderShipped extends Event
{
    public $order;
    public function __construct(Order $order)
    {
        $this->order = $order;
    }
}
Then create an event listener in the app/Listeners and name it OrderShippedListener, then put the content below in this class:
namespace App\Listeners;
use Illuminate\Contracts\Queue\ShouldQueue;
use Log;
class OrderShippedListener implements ShouldQueue
{
    public $connection = 'rabbitmq_direct';

    public function __construct()
    {

$randomNumber = rand(0, 1);
$queueKeys = ['email.service1', 'email.service2'];
$routingKeys = ['email1', 'email2'];

config([ 'queue.connections.rabbitmq_direct.queue' => $queueKeys[$randomNumber],
   'queue.connections.rabbitmq_direct.options.queue.exchange_routing_key' => $routingKeys[$randomNumber]
]);

    }
    /**
     * Handle the event.
     *
     * @param  $event
     * @return void
     */
    public function handle($event)
    {
        Log::info('Order shipped from e-store:' . json_encode($event));
    }
}
As you might have noticed we have set the default connection to the “rabbitmq_direct” we have created few step backs by the code below:
public $connection = 'rabbitmq_direct';
We also created a mechanism for selecting random email service at the time, for sending an email by them.
$randomNumber = rand(0, 1);
$queueKeys = ['email.service1', 'email.service2'];
$routingKeys = ['email1', 'email2'];

config(['queue.connections.rabbitmq_direct.queue' => $queueKeys[$randomNumber], 'queue.connections.rabbitmq_direct.options.queue.exchange_routing_key' => $routingKeys[$randomNumber]
]);
In the app/Providers/EventServiceProvider class add the below code in the $listen array
\App\Events\OrderShipped::class => [
    \App\Listeners\OrderShippedListener::class,
],
For testing our functionality we need to test our project, for that, we create a command which triggers our OrderShipped event.
Create a command in the app/Console/Commands and name it “ShipOrder” and put the content below in this class:
namespace App\Console\Commands;
use App\Order;
use Illuminate\Console\Command;
class ShipOrder extends Command
{
    protected $signature = 'order:ship';

    protected $description = 'Ship a order';

    public function __construct()
    {
        parent::__construct();
    }
    public function handle()
    {
        $order = Order::with('user')->inRandomOrder()->first();
        event(new \App\Events\OrderShipped($order));
        return 0;
    }
}
In the code above we simply select on order randomly and pass it to the event.
Now it’s time to create and configure our email services.create and new lumen project and name it “email-service1”.
- install the RabbitMQ package by running
Composer require vladimir-yuldashev/laravel-queue-rabbitmq:v10.2.2
Then after installation, add the code below in bootstrap/app.php and also uncomment the EventServiceProvider registration line.
$app→register(App\Providers\EventServiceProvider::class);
$app->register(VladimirYuldashev\LaravelQueueRabbitMQ\LaravelQueueRabbitMQServiceProvider::class);
Now we need to configure our .env. In the created project put the config below in the .env file.
QUEUE_CONNECTION=rabbitmq
RABBITMQ_HOST=localhost
RABBITMQ_PORT=5672
RABBITMQ_VHOST=/
RABBITMQ_LOGIN=guest
RABBITMQ_PASSWORD=guest
RABBITMQ_QUEUE=email.service1
RABBITMQ_EXCHANGE_NAME=email.direct
RABBITMQ_EXCHANGE_DECLARE=true
RABBITMQ_EXCHANGE_TYPE=fanout
RABBITMQ_EXCHANGE_PASSIVE=false
RABBITMQ_EXCHANGE_DURABLE=true
RABBITMQ_EXCHANGE_AUTODELETE=false
RABBITMQ_EXCHANGE_ARGUMENTS=default
Since the project is new, we need to create a config file for the queue, So, Create a file and name it “queue.php” in the config folder then put the content below in this file.
<?php
return [

    'default' => env('QUEUE_CONNECTION', 'sync'),

    'connections' => [
        'sync' => [
            'driver' => 'sync',
        ],
        'database' => [
            'driver' => 'database',
            'table' => env('QUEUE_TABLE', 'jobs'),
            'queue' => 'default',
            'retry_after' => 90,
        ],
        'beanstalkd' => [
            'driver' => 'beanstalkd',
            'host' => 'localhost',
            'queue' => 'default',
            'retry_after' => 90,
        ],
        'sqs' => [
            'driver' => 'sqs',
            'key' => env('SQS_KEY', 'your-public-key'),
            'secret' => env('SQS_SECRET', 'your-secret-key'),
            'prefix' => env('SQS_PREFIX', 'https://sqs.us-east-1.amazonaws.com/your-account-id'),
            'queue' => env('SQS_QUEUE', 'your-queue-name'),
            'region' => env('SQS_REGION', 'us-east-1'),
        ],
        'redis' => [
            'driver' => 'redis',
            'connection' => env('QUEUE_REDIS_CONNECTION', 'default'),
            'queue' => 'default',
            'retry_after' => 90,
            'block_for' => null,
        ],
        'rabbitmq' => [
            'driver' => 'rabbitmq',
            'queue' => env('RABBITMQ_QUEUE', 'email.service1'),
            'connection' => PhpAmqpLib\Connection\AMQPLazyConnection::class,
            'hosts' => [
                [
                    'host' => env('RABBITMQ_HOST', '127.0.0.1'),
                    'port' => env('RABBITMQ_PORT', 15672),
                    'user' => env('RABBITMQ_USER', 'guest'),
                    'password' => env('RABBITMQ_PASSWORD', 'guest'),
                    'vhost' => env('RABBITMQ_VHOST', '/'),
                ],
            ],
            'options' => [
                'queue' => [
                    'exchange' => 'email.direct',
                    'exchange_type' => 'direct',
                    'exchange_routing_key' => 'email1',
                    'prioritize_delayed_messages' =>  false,
                    'queue_max_priority' => 10,
                ],
                'exchange' => [
                    'name' => env('RABBITMQ_EXCHANGE_NAME', 'email.service'),
                    'declare' => env('RABBITMQ_EXCHANGE_DECLARE', true),
                    'type' => 'direct',
                    'passive' => env('RABBITMQ_EXCHANGE_PASSIVE', false)
                ],
                'ssl_options' => [
                    'cafile' => env('RABBITMQ_SSL_CAFILE', null),
                    'local_cert' => env('RABBITMQ_SSL_LOCALCERT', null),
                    'local_key' => env('RABBITMQ_SSL_LOCALKEY', null),
                    'verify_peer' => env('RABBITMQ_SSL_VERIFY_PEER', true),
                    'passphrase' => env('RABBITMQ_SSL_PASSPHRASE', null),
                ],
            ],
            'worker' => env('RABBITMQ_WORKER', 'default'),
        ],
    ],

    'failed' => [
        'database' => env('DB_CONNECTION', 'mysql'),
        'table' => env('QUEUE_FAILED_TABLE', 'failed_jobs'),
    ],
];
As you can see above we simply have set the exchange and default queue name with default routing key value in the following array.
‘queue’ => [    'exchange' => 'email.direct',
    'exchange_type' => 'direct',
    'exchange_routing_key' => 'email1',
    'prioritize_delayed_messages' =>  false,
    'queue_max_priority' => 10,],
We are going to work with jobs and queues, so the job_failed is handled by the database so we need the job failed migration, so for adding that run command below in the terminal in the main project folder.
php artisan queue:failed-table
When the order in the E-store is shipped the “OrderShipped” is triggered, then our handler serializes the order information and sends it to the RabbitMQ direct queues accompanied with routing key. In this new service, we should listen for that event, we are also bound to the “email.direct” exchange and “email.service1” queue with the routing key of “email1”.By doing the configuration we are now capturing the corresponding events.
Now we need to add our listener for that capturing the events, So create a listener and name it OrderShippedListener in the app/Listeners folder (just the same in the E-store Project), then put the content below in this class.
namespace App\Listeners;
use Illuminate\Contracts\Queue\ShouldQueue;
use Log;
class OrderShippedListener implements ShouldQueue
{

    public function __construct()
    {
    }

     public function handle($event)
    {
        Log::info('Order shipped from Email service 1:' . json_encode($event));
    }
}
In this Listener class, we get the $event object which contains the required information which is sent by the publisher or the producer which is the E-store app. In the real project, you would probably follow your work to do whatever you want with $event object, but for now, we only Log the event just to show we have successfully captured the events.
We are done with Email Service 1.
Now we should develop the second email service. For easing the process just copy the “email-servic1” project and rename it to “email-service2”.
We need to reconfigure the .env file and queue.php file as well.
In the .env file delete the configuration for RabbitMQ from the previous project and put the content below in the .env file (or replace them).
QUEUE_CONNECTION=rabbitmqRABBITMQ_HOST=localhost
RABBITMQ_PORT=5672
RABBITMQ_VHOST=/
RABBITMQ_LOGIN=guest
RABBITMQ_PASSWORD=guest
RABBITMQ_QUEUE=email.service2
RABBITMQ_EXCHANGE_NAME=email.direct
RABBITMQ_EXCHANGE_DECLARE=true
RABBITMQ_EXCHANGE_TYPE=fanout
RABBITMQ_EXCHANGE_PASSIVE=false
RABBITMQ_EXCHANGE_DURABLE=true
RABBITMQ_EXCHANGE_AUTODELETE=false
RABBITMQ_EXCHANGE_ARGUMENTS=default
As you see we reconfigure the queue name for listening to the new queue named “email.service2” and replace the configuration below with “rabbitmq” in the connections array in the config/queue.php file.
'rabbitmq' => [
    'driver' => 'rabbitmq',
    'queue' => env('RABBITMQ_QUEUE', 'email.service2'),
    'connection' => PhpAmqpLib\Connection\AMQPLazyConnection::class,
    'hosts' => [
        [
            'host' => env('RABBITMQ_HOST', '127.0.0.1'),
            'port' => env('RABBITMQ_PORT', 15672),
            'user' => env('RABBITMQ_USER', 'guest'),
            'password' => env('RABBITMQ_PASSWORD', 'guest'),
            'vhost' => env('RABBITMQ_VHOST', '/'),
        ],
    ],
    'options' => [
        'queue' => [
            'exchange' => 'email.direct',
            'exchange_type' => 'direct',
            'exchange_routing_key' => 'email2',
            'prioritize_delayed_messages' =>  false,
            'queue_max_priority' => 10,
        ],
        'exchange' => [
            'name' => env('RABBITMQ_EXCHANGE_NAME', 'email.service'),
            'declare' => env('RABBITMQ_EXCHANGE_DECLARE', true),
            'type' => 'direct',
            'passive' => env('RABBITMQ_EXCHANGE_PASSIVE', false)
        ],
        'ssl_options' => [
            'cafile' => env('RABBITMQ_SSL_CAFILE', null),
            'local_cert' => env('RABBITMQ_SSL_LOCALCERT', null),
            'local_key' => env('RABBITMQ_SSL_LOCALKEY', null),
            'verify_peer' => env('RABBITMQ_SSL_VERIFY_PEER', true),
            'passphrase' => env('RABBITMQ_SSL_PASSPHRASE', null),
        ],
    ],
    'worker' => env('RABBITMQ_WORKER', 'default'),
],
As you see we also reconfigured the queue name along with the routing key.
‘queue’ => [            'exchange' => 'email.direct',
            'exchange_type' => 'direct',
            'exchange_routing_key' => 'email2',
            'prioritize_delayed_messages' =>  false,
            'queue_max_priority' => 10,
],
Since we have copied the project “email.service1”, we don't need to create a new listener class for this service.
We are done with the configuration now it’s time to test our services.
In the terminal route to the email-service1 project directory and in the terminal and run the below command:
php artisan rabbitmq:consume
Then open a new terminal and route to the email-service app and run the following command:
php artisan rabbitmq:consume
Now in both, email-service1 and email-service2, we are listening to the corresponding queues.
Now open a new terminal and route to the E-store app and run the following command to rais an OrderShipped event:
php artisan order:ship
Now you should have successfully received the message information in the warehouse and sales app.
By now, We are done with part 3 and the final part of our series.
In the end, I would be happy to take any suggestions about the article and the content as well!