Developing Microservices by using Lumen & RabbitMQ — Part 2
In the previous article, we have tested our event and now we will follow by bringing the RabbitMQ into our workflow to successfully send messages from the e-store to the warehouse and sales app.
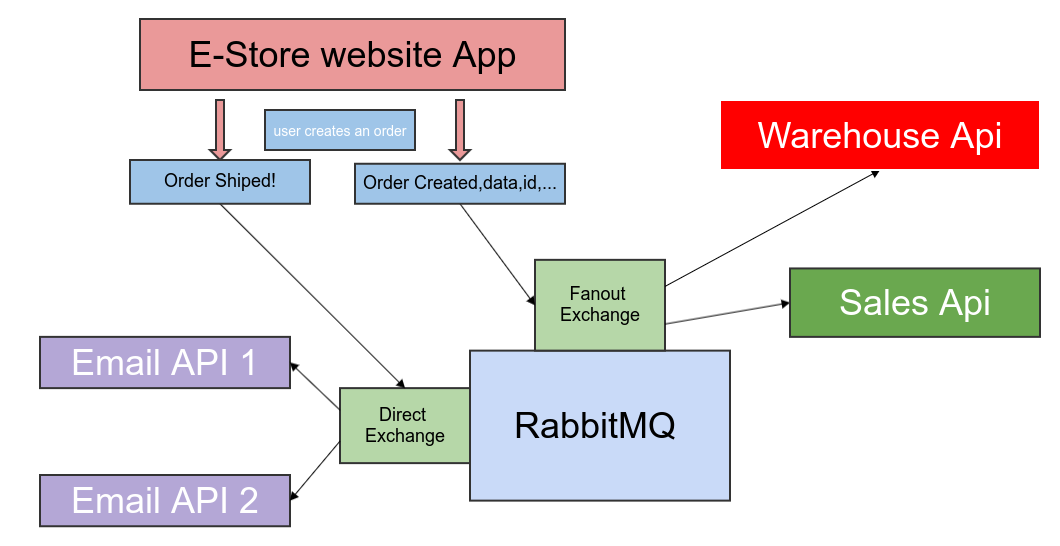
As described in the first part of this series, when one order is created in our store, we will send the order information to the warehouse and sales app to start the process of the order.
We will raise an event in the e-store, then the event listener listens for that event, after capturing the event, the handler sends the message to the exchange, then the exchange sends the copy of the message to the queues that are bind to it, then consumers which are our warehouse and sales apps receives those messages and process the data.
I have added the repository links for references.
Estore repository:
https://github.com/behzadbabaei/lumen-microservice-estore
Warehouse repository:
https://github.com/behzadbabaei/-lumen-microservice-warehouse.git
Sales repository:
https://github.com/behzadbabaei/-lumen-microservice-sales.git
The first step is to configure the RabbitMQ exchanges and queues for our apps.
Once again, I assume that you have a basic understanding of RabbitMQ, And know how to create the exchanges and binding the queues to them.
Go to the RabbitMQ dashboard, then creates one fanout exchange and name it “order.fanout”, Then creates two queues named “order1.fanout”,”order2.fanout” and bind them to the “order.fanout” exchange. We created two queues because we want to bind the “order1.fanout” to the sales app and “order2.fanout” to the warehouse app.
The second step is to install the RabbitMQ package in our e-store project, for that, install the following package which is compatible with our lumen version.
Package github repository:
https://github.com/vyuldashev/laravel-queue-rabbitmq
composer require vladimir-yuldashev/laravel-queue-rabbitmq:v10.2.2
Add the following lines in the project .env file
RABBITMQ_HOST=localhost
RABBITMQ_PORT=5672
RABBITMQ_VHOST=/
RABBITMQ_LOGIN=guest
RABBITMQ_PASSWORD=guest
RABBITMQ_QUEUE=order1.fanout
RABBITMQ_EXCHANGE_NAME=order.fanout
RABBITMQ_EXCHANGE_DECLARE=true
RABBITMQ_EXCHANGE_TYPE=fanout
RABBITMQ_EXCHANGE_PASSIVE=false
RABBITMQ_EXCHANGE_DURABLE=true
RABBITMQ_EXCHANGE_AUTODELETE=false
RABBITMQ_EXCHANGE_ARGUMENTS=default
Then in the config/queue.php in the connections section add the below code( this is the RabbitMQ config)
'rabbitmq' => [
    'driver' => 'rabbitmq',
    'queue' => env('RABBITMQ_QUEUE', 'order1.fanout'),
    'connection' => PhpAmqpLib\Connection\AMQPLazyConnection::class,
    'hosts' => [
        [
            'host' => env('RABBITMQ_HOST', '127.0.0.1'),
            'port' => env('RABBITMQ_PORT', 15672),
            'user' => env('RABBITMQ_USER', 'guest'),
            'password' => env('RABBITMQ_PASSWORD', 'guest'),
            'vhost' => env('RABBITMQ_VHOST', '/'),
        ],
    ],
    'options' => [
        'queue' => [
            'exchange' => 'order.fanout',
            'exchange_type' => 'fanout',
            'prioritize_delayed_messages' =>  false,
            'queue_max_priority' => 10,
        ],
        'exchange' => [
            'name' => env('RABBITMQ_EXCHANGE_NAME', 'order.fanout'),
            'declare' => env('RABBITMQ_EXCHANGE_DECLARE', true),

            'type' => 'fanout',
            'passive' => env('RABBITMQ_EXCHANGE_PASSIVE', false),
            'durable' => env('RABBITMQ_EXCHANGE_DURABLE', true),
            'auto_delete' => env('RABBITMQ_EXCHANGE_AUTODELETE', false),
            'arguments' => env('RABBITMQ_EXCHANGE_ARGUMENTS'),
        ],
        'ssl_options' => [
            'cafile' => env('RABBITMQ_SSL_CAFILE', null),
            'local_cert' => env('RABBITMQ_SSL_LOCALCERT', null),
            'local_key' => env('RABBITMQ_SSL_LOCALKEY', null),
            'verify_peer' => env('RABBITMQ_SSL_VERIFY_PEER', true),
            'passphrase' => env('RABBITMQ_SSL_PASSPHRASE', null),
        ],
    ],
Then in the bootstrap/app.php add the following line:
$app->register(VladimirYuldashev\LaravelQueueRabbitMQ\LaravelQueueRabbitMQServiceProvider::class);
one more step is that we need to change the default queue driver of our project, for that, we change the following config in the .env
QUEUE_CONNECTION=rabbitmq
by above config, we set our queue driver to RabbitMQ that we defined in the config/queue.php
we are done now with the e-store and it’s time to create the warehouse and sales app.
Warehouse app.
For avoiding wasting time on new lumen installation, just copy the e-store project and name it warehouse and follow the steps
- delete the OrderCreate command in the app/Console/Commands folder, then update the Kernel.php file in the app/Console and delete the command from $commands array.
protected $commands = [ ];
the $commands should be empty because in the consumer app we don’t need that commands
- delete the OrderCreated event in the app/Events folder we don’t need that event in the consumer project
- delete the user and order migrations from this project two we don’t need them in these apps too.
We are going to work with jobs and queues, so the job_failed is handled by the database so we need the job failed migration, so for adding that run command below in the terminal in the main project folder
php artisan queue:failed-table
by running that command, lumen adds the required migrations for us
then it’s time for adding the RabbitMQ configs. Since we have copied the e-store app, we don’t have to install the RabbitMQ package again, we only have to reconfigure our queue, so follow the below steps:
- add the following config in the sales .env file
RABBITMQ_HOST=localhost
RABBITMQ_PORT=5672
RABBITMQ_VHOST=/
RABBITMQ_LOGIN=guest
RABBITMQ_PASSWORD=guest
RABBITMQ_QUEUE=order1.fanout
RABBITMQ_EXCHANGE_NAME=order.fanout
RABBITMQ_EXCHANGE_DECLARE=true
RABBITMQ_EXCHANGE_TYPE=fanout
RABBITMQ_EXCHANGE_PASSIVE=false
RABBITMQ_EXCHANGE_DURABLE=true
RABBITMQ_EXCHANGE_AUTODELETE=false
RABBITMQ_EXCHANGE_ARGUMENTS=default
As you can see we assign the “order1.fanout” to this app
Now it’s time fo configuring the config/queue.php and please add the below config in the connections property in the queue.php
'rabbitmq' => [
    'driver' => 'rabbitmq',
    'queue' => env('RABBITMQ_QUEUE', 'order1.fanout'),
    'connection' => PhpAmqpLib\Connection\AMQPLazyConnection::class,
    'hosts' => [
        [
            'host' => env('RABBITMQ_HOST', '127.0.0.1'),
            'port' => env('RABBITMQ_PORT', 15672),
            'user' => env('RABBITMQ_USER', 'guest'),
            'password' => env('RABBITMQ_PASSWORD', 'guest'),
            'vhost' => env('RABBITMQ_VHOST', '/'),
        ],
    ],
    'options' => [
        'exchange' => [
            'name' => env('RABBITMQ_EXCHANGE_NAME', 'order.fanout'),
            'declare' => env('RABBITMQ_EXCHANGE_DECLARE', true),
            'type' => env('RABBITMQ_EXCHANGE_TYPE', AMQP_EX_TYPE_FANOUT),
            'passive' => env('RABBITMQ_EXCHANGE_PASSIVE', false)
        ],
        'ssl_options' => [
            'cafile' => env('RABBITMQ_SSL_CAFILE', null),
            'local_cert' => env('RABBITMQ_SSL_LOCALCERT', null),
            'local_key' => env('RABBITMQ_SSL_LOCALKEY', null),
            'verify_peer' => env('RABBITMQ_SSL_VERIFY_PEER', true),
            'passphrase' => env('RABBITMQ_SSL_PASSPHRASE', null),
        ],
    ],
    'worker' => env('RABBITMQ_WORKER', 'default'),
],
and after all, you need to configure the sales app database connections( you might need to specify the database connection and DB or username and pass)
after doing the above configuration run the below commands
php artisan cache:clearcomposer dumpa
we are done with the sales app and now it’s time to configure the warehouse app.
Configuring the warehouse app is exactly like the sale app with small changes. So just copy the sales app and name it warehouse.
Change the RabbitMQ configuration in the .env file to code below
RABBITMQ_HOST=localhost
RABBITMQ_PORT=5672
RABBITMQ_VHOST=/
RABBITMQ_LOGIN=guest
RABBITMQ_PASSWORD=guest
RABBITMQ_QUEUE=order2.fanout
RABBITMQ_EXCHANGE_NAME=order.fanout
RABBITMQ_EXCHANGE_DECLARE=true
RABBITMQ_EXCHANGE_TYPE=fanout
RABBITMQ_EXCHANGE_PASSIVE=false
RABBITMQ_EXCHANGE_DURABLE=true
RABBITMQ_EXCHANGE_AUTODELETE=false
RABBITMQ_EXCHANGE_ARGUMENTS=default
As you can see we have set the RabbitMQ default queue name to “order2.fanout” and now it’s bound to that queue.
Then configure the config/queue.php and the below config in the connections property
'rabbitmq' => [
    'driver' => 'rabbitmq',
    'queue' => env('RABBITMQ_QUEUE', 'order2.fanout'),
    'connection' => PhpAmqpLib\Connection\AMQPLazyConnection::class,
    'hosts' => [
        [
            'host' => env('RABBITMQ_HOST', '127.0.0.1'),
            'port' => env('RABBITMQ_PORT', 15672),
            'user' => env('RABBITMQ_USER', 'guest'),
            'password' => env('RABBITMQ_PASSWORD', 'guest'),
            'vhost' => env('RABBITMQ_VHOST', '/'),
        ],
    ],
    'options' => [
        'exchange' => [
            'name' => env('RABBITMQ_EXCHANGE_NAME', 'order.fanout'),
            'declare' => env('RABBITMQ_EXCHANGE_DECLARE', true),
            'type' => env('RABBITMQ_EXCHANGE_TYPE', AMQP_EX_TYPE_FANOUT),
            'passive' => env('RABBITMQ_EXCHANGE_PASSIVE', false)
        ],
        'ssl_options' => [
            'cafile' => env('RABBITMQ_SSL_CAFILE', null),
            'local_cert' => env('RABBITMQ_SSL_LOCALCERT', null),
            'local_key' => env('RABBITMQ_SSL_LOCALKEY', null),
            'verify_peer' => env('RABBITMQ_SSL_VERIFY_PEER', true),
            'passphrase' => env('RABBITMQ_SSL_PASSPHRASE', null),
        ],
    ],
    'worker' => env('RABBITMQ_WORKER', 'default'),
],
After doing the above configuration run the below commands
php artisan cache:clearcomposer dumpa
we have configured the RabbitMq in our e-store and warehouse and sales app, so it’s time to test them.
In the terminal route to the sales project director and in run the terminal and run the below commands
php artisan rabbitmq:consume
the open new terminal and route to the warehouse app and run the following commands:
php artisan rabbitmq:consume
Now in the both, warehouse and the sales app, we are listening to the corresponding queues.
Now open a new terminal and route to e-store app and run the following command to rais e an event
php artisan order:create
Now you should have successfully received the message information in the warehouse and sales app.
By now, We are done with part 2 of our series, In the following article, we will cover the direct exchange and develop our email services.
In the end, I would be happy to take any suggestions about the article and the content as well!