Developing Microservices by using Lumen & RabbitMQ — Part 1
In the following series, I would present the way to develop a simple microservice architecture by using Lumen and RabbitMQ Message broker.
To grasp the purpose of these series, understanding the basics of lumen, events, and also RabbitMQ is required.
What is RabbitMQ?
RabbitMQ is the most widely deployed open-source message broker. This message broker can be used for sending and receiving messages from one application to the other applications.
For more information please visit:
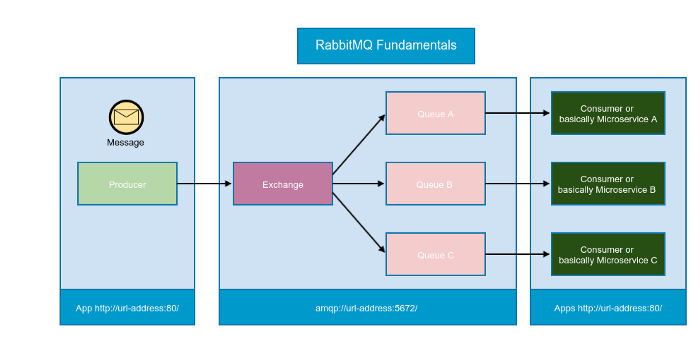
RabbitMQ Fundamentals:
Producer: A producer is a user application that sends messages to the consumers.
Consumer:
A consumer is a user application that receives messages.
Message:
It’s a simple serialized object from the producer!
Exchange:
An exchange is a very simple thing. On one side it receives messages from producers and the other side pushes them to queues. This is a place that messages come first and its main purpose is to decide which consumer application, the message should go!
Queue:
A queue is a buffer that stores messages. basically, the exchange routes the message to queues, then the consumer clients receive messages from the queue. we have queues as many as the consumer’s applications!
As it’s depicted in the image above, the producers send the message to the exchange first, the exchange decides which queues, the message should go. The RabbitMQ works between the producer and consumers.
Types of exchanges in RabbitMQ:
Fanout
Fanout exchange basically sends a copy of messages to all the queues it knows. (in the dashboard every queue should be bind ed to one exchange)
Direct
A direct exchange delivers messages to queues based on a message routing key. The routing key is a message attribute added to the message header by the producer. Think of the routing key as an “address” that the exchange is using to decide how to route the message.
Topic
Topic exchanges route messages to one or many queues based on matching between a message routing key and the pattern that was used to bind a queue to an exchange
Headers
A header exchange is an exchange that route messages to queues based on message header values instead of routing key. … If a match is found, it routes the message to the queue whose binding value is matched and if a match is not found, it ignored the message.
What we are going to do?
We are going to cover the fanout and direct exchange in these series.
We are going to develop the simple microservice architecture that consists of 4 microservice, in which these services are covering the one eCommerce store functionalities.
On our store we assume that one user creates an order, then one event is raised that events handle the sending the required information to other microservices like the warehouse app, sales app, email notification services. In this approach, we are sending the messages to other apps in an asynchronous manner and one benefit of this approach is, the user does not have to wait for the response fro the other apps and This is the power that rabbitMq gives us.
We assume one user has purchased one product on our website, then we have to notify the corresponding apps or APIs like the warehouse app and the sales app, we do this by raising the OrderCreated event, then the event handler sends the order information to other application by using RabbitMQ. For this purpose, we are going to use the Fanout exchange. When the order is shipped, then we are going to send the notification to the user by email, for this task, we are going to use Direct exchange with email service.
In the beginning, we are going to create a simple service using lumen version 7.0 which simply raise an event then log the data, later on, we step by step change our services to use RabbitMQ to achieve our goal.
Let’s start!
I assumed you have installed the RabbitMQ on your systems or you have cloud service for following up with these series!
- creates a lumen project and name it estore.
composer create-project — prefer-dist laravel/lumen estore
- after installation completed, in the bootstrap/app.php file uncomment the line
$app→register(App\Providers\EventServiceProvider::class);
- Then creates two migration for Order and User Model
run the below command:
php artisan make:migration create_users_table
Then put the below code in the migration file
$table->id();
$table->string('name');
$table->string('email')->unique();
$table->timestamp('email_verified_at')->nullable();
$table->string('password');
$table->rememberToken();
$table->timestamps();
Run the below command:
php artisan make:migration create_orders_table
Then put the below code in the migration file
$table->id();
$table->unsignedInteger('user_id')->default(1);
$table->string('product_name')->default('item 1');
$table->decimal('quantity')->default(1);
$table->decimal('total_price')->default(1);
$table->timestamps();
The migration for failed jobs also requires so run following command
php artisan queue:failed-table
And finally, run:
php artisan migrate
populates the tables with some dummy data or you could create a seeder for this task.
Now we should configure our first event
in the app/Providers/EventServiceProvider
add the below code in the $listen array
\App\Events\OrderCreated::class => [
    \App\Listeners\OrderCreatedListener::class,
],
creates a class named OrderCreated (extends Event class) in the app/Events folder and put the below code in it
class OrderCreated extends Event
{
    public $order;
    public function __construct(Order $order)
    {
        $this->order = $order;
    }
}
Then we should create a listener class for our event.in the app/Listeners create one class and name it OrderCreatedListener and put the below code in that class.
namespace App\Listeners;
use Illuminate\Contracts\Queue\ShouldQueue;
use Log;
class OrderCreatedListener implements ShouldQueue
{

    public function __construct()
    {

    }

    public function handle($event)
    {
        Log::info('Order created on estore:' . json_encode($event));
    }
}
we just simply are logging the event data nothing fancy in it.
For testing our event and listener I’m going to create a command(you could do whatever is convenient for you, perhaps creating one controller to test it).
In the app/Console/Commands creates a class named CreateOrder,
then put the content below in it.
namespace App\Console\Commands;
use App\Order;
use Illuminate\Console\Command;
class CreateOrder extends Command
{
    protected $signature = 'order:create';

    protected $description = 'Create an order';

    public function __construct()
    {
        parent::__construct();
    }

    public function handle()
    {
        $order = Order::with('user')->inRandomOrder()->first();
        event(new \App\Events\OrderCreated($order));
        return 0;
    }
}
now we should add our command to the available commands handler in our project. For this in the Kernel.php file in the app/Console folder put the line below in the $commands array like below (also import the class)
protected $commands = [
    CreateOrder::class
];
For the beginning of this project, you can use any queue driver like( we are going to change it and use rabbit in the future)
For configuring the queue copy the vendor/laravel/config/queue.php to config/queue.php (if config folder does not exist in your project creates it);
now in the bootstrapp/app.php file, add the below line
$app→configure('queue');
Everything is ready, now we can test our event. First in your project open terminal and run:
php artisan queue:work
then run the below code in another terminal:
php artisan order:create
In the line above we running our order create a command that we created a few steps back. Now look at the log file and it should be working fine!
Until now we were just setting up everything necessary for starting our main task, Now we are ready for stepping forward and creates our microservices.
By now, We are done with part 1 of our series, In the following article, we will cover the fanout exchange and develop our warehouse and sales app.
In the end, I would be happy to take any suggestions about the article and the content as well!