Creating a microservices & Api gateway by using Lumen
Creating a microservices & API gateway by using Lumen
In this article, I will explain a simple API gateway architecture in the microservice environment, this article shows how we can use this pattern for exposing our services to external consumers.
API gateway is not a new term, but it‘s still a little fuzzy for new starters to grasp the terminology or how they could really use this pattern to solve their problem.
But What is an API Gateway?
I have come across many definitions and you might have your own definition too, So I would say: API Gateways is a single, unified API entry point across one or more internal APIs, that’s it!
You may have many internal microservice in which each one has some responsibility and actually do something in your echo systems, but you don't want them to be exposed to the outside world, instead, you want one single entry point which talks and interact with the internal services, and clients talks to that entry point which is the API gateway.
And Why Do Microservices Need an API Gateway?
- Using API gateways will help us to prevent the exposure of our internal services to the external world and clients.
- By using API gateways we could provide routing for the external request to internal microservices
- API gateway adds one layer so it helps to prevent malicious attacks like SQL Injection, DoS attacks. Api gateways can also be used as an authorization layer to control the clients over the resources.
- Using API gateways will decrease the complexity, for example, every service might need and authorization or access control which it adds more time for development. using gateway can remove these concerns.
by unifying all entry points to the internal services, you can have many capabilities such as analytics, lifecycle management, auditing, and many other capabilities.
Let‘s talk about what we are going to build.
All of the projects are developed using Lumen micro-framework version 5.7. I will not explain or train the Lumen and I assume you are already familiar with Lumen and have hands on it!
I have put all the source code on git so you could clone the projects and follow the article with the project samples for a better understanding of the article and project that we are trying to build.
Products API
https://gitlab.com/behzadbabaei69/microserviceproductsapi.git
Orders API
https://gitlab.com/behzadbabaei69/microserviceordersapi.git
API gateway
https://gitlab.com/behzadbabaei69/microserviceapigateway.git
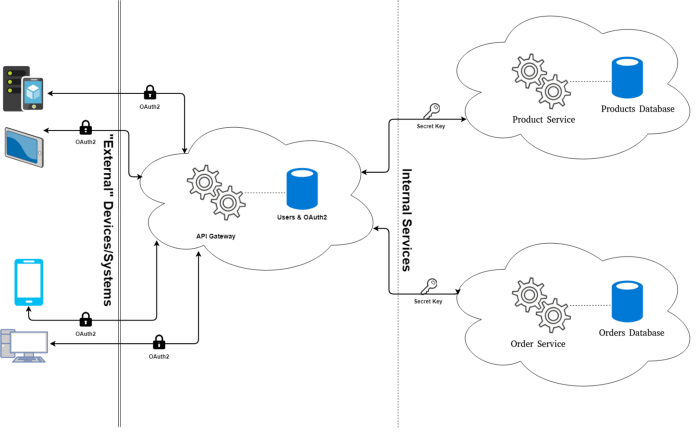
In this scenario, we have some internal microservices on the right which includes 2 microservice, product & order service.in the middle, we have an API gateway which we use for authorization and also routing the request to the internal microservices, by doing so, we have also an access control layer over the client’s requests and what has requested. On the left side, we have a different client who will consume our APIs. A client could be any sort of application web or mobile app.
This is a very simple scenario, we want to accomplish two things here:
1.exposeing our desired services to the outside world
2. protect our internal microservices from external clients
All the clients consuming our services would interact with our API gateway. For authorize request in API gateway, we use oAuth2 and for this purpose, we would use a lumen passport package.
Now our internal services are not protected, so for that, we would implement a secret key mechanism. It means when an API gateway wants to call one internal microservice, it has to embed a secret key in the request header as Authorization and that key has to be among allowed secret keys in that service, in that manner we authorize the request from API gateway to internal microservices.
Let’s start building our services first, we start with the Product service.
We use lumen version 5.7 for developing all the services and for simplicity, our services perform only CRUD operations.
Let’s walk through the process of creating the ProductsApi.
Product Service:
Step 1: create a project lumen for product API name it ProductsApi (for this use lumen official website)
Step 2: uncomment the below 2 lines in the bootstrap/app.php file for using Facades and Eloquent.
$app->withFacades();
$app->withEloquent();
Step 3: add all routes in web.php in routes/web.php for crud operations
$router->group(['prefix' => 'api'], function () use ($router) {
$router->group(['prefix' => 'product'], function () use ($router) {
$router->get('/', ['uses' => 'ProductController@index']);
$router->post('/', ['uses' => 'ProductController@store']);
$router->get('/{product}', ['uses' => 'ProductController@show']);
$router->patch('/{product}', ['uses' => 'ProductController@update']);
$router->delete('/{product}', ['uses' => 'ProductController@destroy']);
});
});
We would create one trait for unifying responses in our api, so in the app folder, create a “Traits” folder, then create one trait and name it ApiResponse and put below code in these traits (Do not forget about namespaces).
trait ApiResponse
{
public function successResponse($data, $statusCode = Response::HTTP_OK)
{
return response()->json(['data' => $data], $statusCode);
}
public function errorResponse($errorMessage, $statusCode)
{
return response()->json(['error' => $errorMessage, 'error_code' => $statusCode], $statusCode);
}
}
After creating traits, use it in the Controller.php class in the app/Http/Controllers folder.
Just Like That!
Step 4: now it's time for database configuration and our tables migrations.
We only have one model in this microservice which is named Product, first, create a database and set the required credential in the .env file for accessing the database. I would use MySQL as my database.
so first create a migration for the Product table by executing the following command:
php artisan make:migration --create=products create_products_table
our product has a simple scheme and has only two fields: name, price.
Schema::create('products', function (Blueprint $table) {
    $table->increments('id');
    $table->string('name')->nullable();
    $table->decimal('price')->nullable();
    $table->timestamps();
});
We also need seed data for testing our APIs so for that we use the Factory facade in the lumen.in database/factories/ModelFactory.php file edit the factory as below:
$factory->define(App\Product::class, function (Faker\Generator $faker) {
    return [
        'name' => $faker->userName,
        'price' => $faker->numberBetween(10,200),
    ];
});
then in database/seeds/DatabaseSeeder.php class add the following code for creating 50 sample records for our product tables (you can edit it as you desire)!
factory(\App\Product::class, 50)->create();
Step 5: create a model named Product and in the app folder (there is a User model as default so remove it!).please add fillable fields too.
protected $fillable = [
    'name', 'price'
];
Step 6:create a controller named ProductController and create all the functions required for the mentioned routes in step 3
public function index(){...}

public function show($product){...}

public function store(Request $request){...}

public function update(Request $request, $product){...}

public function destroy($product){...}
Step 7: test all the mentioned routes in step 3 using postman or any other test tools which you are fine with.
Our product service is complete now we procced to Order Service and creation of order service is like Product service.
Repeat step 1&2 but name this service OrdersService
Step 3: for creating a required route in our microservice, put the below code in the routes/web.php
$router->group(['prefix' => 'api'], function () use ($router) {
    $router->group(['prefix' => 'order'], function () use ($router) {
        $router->get('/', ['uses' => 'OrderController@index']);
        $router->post('/', ['uses' => 'OrderController@store']);
        $router->get('/{order}', ['uses' => 'OrderController@show']);
        $router->patch('/{order}', ['uses' => 'OrderController@update']);
        $router->delete('/{order}', ['uses' => 'OrderController@destroy']);
    });
});
For a response just copy the ApiResponse trait we created in the previous microservice and put it in the app folder and then use that trait in Controller class.
Step 4: Create a migration for the orders table and then create the seed data and change the factory too.
php artisan make:migration — create=orders create_orders_table
Schema::create('orders', function (Blueprint $table) {
    $table->increments('id');
    $table->integer('quantity')->unsigned();
    $table->decimal('total_price')->unsigned();
    $table->decimal('discount')->unsigned()->default(0);
    $table->integer('product_id')->unsigned();
    $table->timestamps();
});
Step 5: create a model named Order in the app folder (there is a User model as default so remove it!) then add the fillable fields too.
protected $fillable = [
    'quantity',
    'discount',
    'total_price',
    'product_id'
];
Step 6:create a controller named ProductController and create all the functions for the mentioned routes in step 3
public function index(){...}

public function show($order){...}

public function store(Request $request){...}

public function update(Request $request, $order){...}

public function destroy($order){…}
Step 7: test all the mentioned routes in step 3 using postman or any other test tools which you are fine with.
Until this moment we had only developed two services that work separately and we have tested all the functionality that we needed! (I hope you have tested your Api's).
Now it‘s time to explain the API gateway.
Repeat steps 1 & 2 in the previous microservices but name this project ApiGateway. Our API gateway can be used for authorization too so for that, we would use a lumen passport package.
Install the lumen passport package in the ApiGateway project and after installing the package and its configuration, we could proceed with our API gateway.
step 3:
Step 3 is a little long so please bear with me till the end. I explained earlier for protecting our internal services, API gateway has to use the secret key mechanism, in this approach, API gateway for consuming each one of our internal services would have to provide a secret key as Authorization param in request headers.
We would like to authorize the request from clients in our gateways so in bootstrap/app.php add the following code for route middleware.
$app->routeMiddleware([
    'auth' => App\Http\Middleware\Authenticate::class,
    'client.credentials' => \Laravel\Passport\Http\Middleware\CheckClientCredentials::class,
]);
As we said before, our gateway would also route the requests to the internal microservices, so in routes/web.php add the following routes:
$router->group(['prefix' => 'api', 'middleware' => ['client.credentials']], function () use ($router) {
    $router->group(['prefix' => 'product'], function () use ($router) {
        $router->get('/', ['uses' => 'ProductController@index']);
        $router->post('/', ['uses' => 'ProductController@store']);
        $router->get('/{product}', ['uses' => 'ProductController@show']);
        $router->patch('/{product}', ['uses' => 'ProductController@update']);
        $router->delete('/{product}', ['uses' => 'ProductController@destroy']);
    });
    $router->group(['prefix' => 'order'], function () use ($router) {
        $router->get('/', ['uses' => 'OrderController@index']);
        $router->post('/', ['uses' => 'OrderController@store']);
        $router->get('/{order}', ['uses' => 'OrderController@show']);
        $router->patch('/{order}', ['uses' => 'OrderController@update']);
        $router->delete('/{order}', ['uses' => 'OrderController@destroy']);
    });
});
We would use ApiResponse that we created in previous services but with a little change to get the Errors from internal services and returning them to the clients.
trait ApiResponse
{
    public function successResponse($data, $statusCode = Response::HTTP_OK)
    {
        return response($data, $statusCode)->header('Content-Type', 'application/json');
    }
    public function errorResponse($errorMessage, $statusCode)
    {
        return response()->json(['error' => $errorMessage, 'error_code' => $statusCode], $statusCode);
    }
    public function errorMessage($errorMessage, $statusCode)
    {
        return response($errorMessage, $statusCode)->header('Content-Type', 'application/json');
    }
}
As every microservice should be independent and they reside in their own server, so for interacting with them, we need to know where they reside. We would basically run our microservices on a different port like product service on localhost:8100 and order service on localhost:8200 and API gateway on localhost:8000.every internal microservice is protected with a secret key, it means when API gateway wants to call an API on any internal microservice, it should imbed that secret key as Authorization header on request, so in that way, we authorize the requests from API gateway to internal microservices. so here we put the address of microservices and their secret_key in .env files.
Create 4 parameters on the .env file in API gateways. Like bellow:
PRODUCTS_SERVICE_BASE_URI=http://localhost:8100/api
PRODUCTS_SERVICE_SECRET=mysecret1
ORDERS_SERVICE_BASE_URI=http://localhost:8200/api
ORDERS_SERVICE_SECRET=mysecret2
Now we create one config file for getting settings via lumen config facades. So in the root directory of the project create a config folder and then create a file named services.php and put the content below on it.
return [
    'products' => [
        'base_uri' => env('PRODUCTS_SERVICE_BASE_URI'),
        'secret' => env('PRODUCTS_SERVICE_SECRET')
    ],
    'orders' => [
        'base_uri' => env('ORDERS_SERVICE_BASE_URI'),
        'secret' => env('ORDERS_SERVICE_SECRET'),
    ]
];
on the bootstrap/app.php file add the following code
$app->configure('services');
after the line:
$app->withEloquent();
This was one side of the configuration, we need a mechanism for authorization on the internal microservices side, For that, we create a middleware and enforce every route to go through this middleware and every request that comes in from api gateway too, So in both Product and Order microservices, create a middleware named AuthenticateAccess inside the app/Http/Middleware folder and then put the content below on those class "handle" function.
public function handle($request, Closure $next)
{
    $allowedSecrets = explode(',', env('ALLOWED_SECRETS'));
    if (in_array($request->header('Authorization'), $allowedSecrets)) {
        return $next($request);
    }
    abort(Response::HTTP_UNAUTHORIZED);
}
In Api gateway we had a secret for every service on the .env file, now on every microservice, we have to keep that secret somewhere to check if the secret matches, so in the Product service, we add one parameter named ALLOWED_SECRETS in the .env file. as it‘s an array, we could have multiple secrets, as you see here, we check if the Authorization is set on the header and we compare it against the allowed secrets in the .env file, and if they match we would proceed with to next part.
Remember that the allowed secret should match the secret keys in the API gateway .env file parameters (PRODUCTS_SERVICE_SECRET, ORDERS_SERVICE_SECRET).
We should have this middleware for both Order and Product service. After adding middlewares, we need to activate them. So in product service on bootstrap/app.php uncomment the middleware part and add code below. by using app->middleware we would enforce every request to go through this authorization middleware.
$app->middleware([
    App\Http\Middleware\AuthenticateAccess::class
]);
Now it‘s time to create our services in API gateway which are responsible for interacting with internal microservices. Their job is to consume the internal microservices and get the result from those services and return them to the clients. We have to create one trait and by using that, we can make a request to internal services. Create a trait named RequestService and put the content below on that trait:
public function request($method, $requestUrl, $formParams = [], $headers = [])
{
    $client = new Client([
        'base_uri' => $this->baseUri
    ]);
    if (isset($this->secret)) {
        $headers['Authorization'] = $this->secret;
    }
    $response = $client->request($method, $requestUrl,
        [
            'form_params' => $formParams,
            'headers' => $headers
        ]
    );
    return $response->getBody()->getContents();
}
We have two microservices so here we would create two services named OrderService, ProductService inside the app/Services folder. inside the Product, service add code below in that class.
class ProductService
{
    use RequestService;
    public $baseUri;
    public $secret;
    public function __construct()
    {
        $this->baseUri = config('services.products.base_uri');
        $this->secret = config('services.products.secret');
    }
    public function fetchProducts()
    {
        return $this->request('GET', '/api/product');
    }
    public function fetchProduct($product)
    {
        return $this->request('GET', "/api/product/{$product}");
    }
    public function createProduct($data)
    {
        return $this->request('POST', '/api/product', $data);
    }
    public function updateProduct($product, $data)
    {
        return $this->request('PATCH', "/api/product/{$product}", $data);
    }
    public function deleteProduct($product)
    {
        return $this->request('DELETE', "/api/product/{$product}");
    }
}
Now we would also need to create another service for OrderService, so create another class named OrderService and put the code below in that class:
class OrderService
{
    use RequestService;
    public $baseUri;
    public $secret;
    public function __construct()
    {
        $this->baseUri = config('services.orders.base_uri');
        $this->secret = config('services.orders.secret');
    }
    public function fetchOrders()
    {
        return $this->request('GET', '/api/order');
    }
    public function fetchOrder($order)
    {
        return $this->request('GET', "/api/order/{$order}");
    }
    public function createOrder($data)
    {
        return $this->request('POST', '/api/order', $data);
    }
    public function updateOrder($order, $data)
    {
        return $this->request('PATCH', "/api/order/{$order}", $data);
    }
    public function deleteOrder($order)
    {
        return $this->request('DELETE', "/api/order/{$order}");
    }
}
As you see, we are only calling the different internal APIs and returning the result from them by using the RequestService trait.
We are almost done. we have created all the required services and we also have set all the configuration required on the API gateway and internal microservices as well.
The last step is creating the controllers on the API gateway for Order and Product routes. so we start with the Product controller.
Create a controller named Product controller and put the content below on that controller:
class ProductController extends Controller
{
    private $productService;
    public function __construct(ProductService $productService)
    {
        $this->productService = $productService;
    }
    public function index()
    {
        return $this->successResponse($this->productService->fetchProducts());
    }
    public function show($product)
    {
        return $this->successResponse($this->productService->fetchProduct($product));
    }
    public function store(Request $request)
    {
        return $this->successResponse($this->productService->createProduct($request->all()));
    }
    public function update(Request $request, $product)
    {
        return $this->successResponse($this->productService->updateProduct($product, $request->all()));
    }
    public function destroy($product)
    {
        return $this->successResponse($this->productService->deleteProduct($product));
    }
}
As you see nothing fancy about the code, we are only using the services in api gateway that we created earlier and those services call the internal microservices and return the result. for order, please create another controller named OrderController and put the content below in that controller:
class OrderController extends Controller
{
    private $orderService;
    private $productService;
    public function __construct(OrderService $orderService, ProductService $productService)
    {
        $this->orderService = $orderService;
        $this->productService = $productService;
    }
    public function index()
    {
        return $this->successResponse($this->orderService->fetchOrders());
    }
    public function show($order)
    {
        return $this->successResponse($this->orderService->fetchOrder($order));
    }
    public function store(Request $request)
    {
        $result = $this->productService->fetchProduct($request->product_id);
        return $this->successResponse($this->orderService->createOrder($request->all()));
    }
    public function update(Request $request, $order)
    {
        return $this->successResponse($this->orderService->updateOrder($order, $request->all()));
    }
    public function destroy($order)
    {
        return $this->successResponse($this->orderService->deleteOrder($order));
    }
}
Note: As you see on the store function we check if the product exists in the product and if it does not exist we would return an appropriate error for the client.
At this point our architecture is complete and we are ready to test our API gateway. There is nothing fancy about this approach, we are only creating one API gateway which is responsible for redirecting the API calls from outside to correspondent internal microservices or return the result from those microservices to the clients.
Perhaps the business in the real world is more complex than what I presented here. Authorization might be much more complicated in gateways. I think this article would help to grasp the idea behind the concept of API gateways and microservices.
In the end, I would be happy to take any suggestions about the article and the content as well!
Thanks for your time.